Showing posts with label Mo's Digital pencil. Show all posts

Friday, August 4, 2017

My Best Pals


Hi Everyone, it's Saskia here.

A lot of people forget how important friends are. Sometimes they are even more important than family.  
 Fortunately, I can say that I have a few lovely girlfriends who are always ready for me. It does not matter what stupidity I take out, they are always there for me.

I made the background with Copic refills, Yupo paper and Copic Activator.

The image is a digital stamp "Best Pals"  from Mo Manning.

 Step 1: First put with BV01thin stripes in her hair.
Step 2: Put with BV02 more thin stripes in her hair.
 
 Step 2: Put with BV04 more thin stripes in her hair.
But make sure you do not mix all the other colours.
 Do not try to put the lines together but next to each other. 
 
  Step 4: Finally, draw a few thin lines with BV08,
but make sure you put only a few lines, otherwise this colour will dominate.


I used the following Copic Markers to colour this print.
 Girl on the left:
Skin: E11-13-15
Eyes: YG07
Hair: C5-7-9, RV13-14-19 and Molotow Neon Pink
Hoody: B21-23-24-26
Pants: RV13-14-19
Sneakers: B21-23-24 and glitter pen

Girl in the middle:
Skin: E0000-000-00-11- R20
Eyes: B24
Hair: BV01-02-04-08
Sweater and legging: YG01-05-07-17
Skirt and socks: C1-3-5-7-9 and Glitter pen
Sneakers: : C1-3-5 and YG07
Skirt: B91-93-95-97-99 
 
Girl on the right:
Skin: E000-00-11-21-R22-BV00
Hair: B24-26-28 and C5-7-9-110
Sweater: R24-27-29-39-C7-glitter pen
Skirt: B91-93-95-97-99
Boots: C5-7-9-110 and Molotow White

Background: RV09-V17-B28
I hope you have read this post with pleasure.

Until next time!

Sunday, March 5, 2017

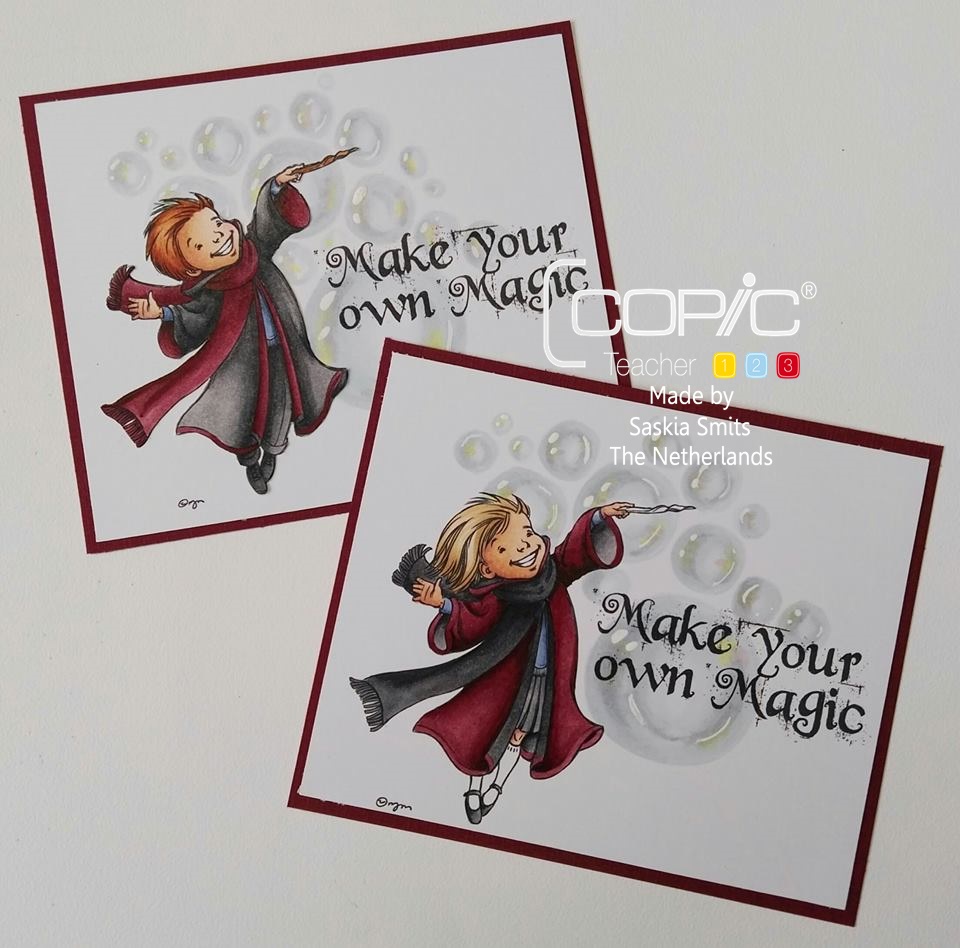
Make your own Magic

 
Hi Everyone, it's Saskia here.
Do you believe in magic??? Well I do. I love to read books, like Harry Potter. So when these new digi stamps come on the 1st of March, I had to buy them. I could not resist them. They look just like Hermione Granger and Ron Weasley. I did not colour them in the Griffendor Colours. Because this post is all about putting a older tutorial in the spotlight. Because I wanted to make some magical bubbles. And Christiana Valenzuela made a tutorial for bubbles in 2015. I took her tutorial as a guideline.


For this  tutorial I just use a stencil from the Dutch brand Pronty. This is a brand new stencil.  

Draw the circles form the stencil with a light grey.
After this step you just have to follow this tutorial form Christiana Valenzuela.

These are pictures from my version of the tutorial.

The images I have used are from Mo's Digital pencil shop "Boy and Girl Wizard"


I have used these Copic Markers:

For the bubbles: BG70 - BV20 - C0 - C1 - R30 -  V01 Y02 
For the boy:
Face: E000 - E00 - E04 - E11 - E21 - R20
Hair: E08 - E97 - E99
Scarf : N7 - R56 - R59 - R89
Shirt: B91 - B93 - B97
Robe: N3 - N5 - N7 - N9 and R56 - R59 - R89
Shoes: N5 - N7 - N9


For the girl:
Face: E000 - E00 - E04 - E11 - E21 - R20
Hair: E51 - E53 - E55
Scarf : N3 - N5 - N7 - N9
Shirt: B91 - B93 - B97
Robe: N3 - N5 - N7 - N9 and R56 - R59 - R89
Pleated skirt: N1 - N3 - N5
Shoes: N5 - N7 - N9


I hope you have read this post with pleasure.
Until next time,

Sunday, December 4, 2016

Singing Elves


Hi Everyone, it's Saskia here.

Every year with Christmas I give my brother, my sister and some friends a special made Christmas creation. This one is for my brother and his family.
 

Actually there is very little colour work in this small project.
I coloured two little elves from the brand Mo Manning, which I have included in this wooden Christmas project. But but it would be boring project without this colourwork.


 Copics Used...
 Skin: E000 - E00 - E11 - E21 -R20
Hair: E13 - E19
Red Shades: R14 - R46 - R59
Gray Shades: W1 - W3 - W5 -W7
Book: E42 - E43 - E44 - E47 and sepia multiliner 0.05

I hope you have read this post with pleasure.
Until next time.

Friday, December 2, 2016

Kerst lantaarn


Hoi Colourstock liefhebbers,

Hoewel Sinterklaas nog niet het land uit is, heb ik toch een kerstproject voor jullie. Dit is een kerstproject voor een heel speciaal iemand. Ik weet nog niet of ze hem al heeft gehad als deze post online komt. Maar das gelukkig geen probleem, want ze weet niet dat deze voor haar is. Maar ik weet zeker dat ze hier heel bij mee is.

Het was best veel werk om dit project te maken, maar wel super leuk om te doen. Eerst heb ik de plaatjes met mijn Copic Markers gekleurd. Ik heb bewust redelijk rustige kleuren gebruikt omdat ik dit het beste vond passen bij dit project. Het mag best opvallen.....maar niet te overheersend zijn.

Daarna heb ik een bruine houten lantaarn bewerkt met witte gesso van Dutch Doobadoo. Ik heb de lantaarn daarna bewerkt met diverse kleuren grijs en zilverkleurige PanPastel. Om zeker te weten dat de PanPastel niet af zo geven, heb ik dit daarna in gespoten met Chaint Inkjet Fix Satin.

Als volgende stap ben ik begonnen met het aankleden van het project. Dat heb ik gedaan met ontzettend veel Foamball Clay sneeuw van Craft Emotions en allerlei rode en witte freubels en met hout.
Ik heb vandaag geen stap voor stap uitleg maar een tip.

Als je op een project met meerdere plaatjes werkt, probeer dan alle kleuren terug te laten komen in de plaatjes die je gebruikt. Ik heb dat in dit project gedaan met de blauwe en rode kleuren. bij meisjes heb ik veel rood gebruikt en bij de jongens veel blauw. Dat heb ik bij beide terug laten komen. De hoofdkleur voor alle plaatjes in een dezelfde kleur bruin zodat het een geheel is. Natuurlijk houd je met je kleur ook rekening met de achtergrond van je project.


 Deze Copic Markers heb ik gebruikt voor Mo Mannings " Urchin with bird"
Huid: E000 - E00 - E04 - E21 - R20
Lippen: E04
Haar: E53 - E55
Blauw tinten: BG70 - BG71 - (zelf gemaakt) - BG73 - BG75 - BG78
Rood tinten: R14 - R46 - R59 - RV99
Donker bruine tinten: E43 - E44 - E47 - E49
Licht bruine tinten: E40 - E41 - E43
Grijs tinten: W1 - W3 -W5
Veter en stiksel: met een bruine multiliner 0.05


Deze Copic Markers heb ik gebruikt voor Mo Mannings "  shall I play for you", alleen heb ik het hondje eraf geknipt.
Huid: E000 - E00 - E04 - E21 - R20
Haar: E53
Blauw tinten: BG71 - (zelf gemaakt) - BG73 - BG75 - BG78
Rood tinten: R14 - R46 - R59 - RV99
Donker bruine tinten: E43 - E44 - E47 - E49
Grijs tinten: W1 - W3 -W5


Deze Copic Markers heb ik gebruikt voor Mo Mannings "  Ragged Angel", alleen heb ik de vleugels verwijderd.
Huid: E000 - E00 - E04 - E21 - R20
Lippen: R20
Haar: E51 - E53
Blauw tinten: BG70 - BG71 - (zelf gemaakt) - BG73 - BG75 - BG78
Rood tinten: R14 - R46 - R59 - RV99
Donker bruine tinten: E43 - E44 - E47 - E49
Licht bruine tinten: E40 - E41 - E43
Grijs tinten: W1 - W3 -W5-W7-W9


En deze markers voor Mo Mannings "  Kids Caroling"
Huid: E000 - E00 - E04 - E21 - R20
Lippen: R20
Haar: E51 - E53
Blauw tinten: BG70 - BG71 - (zelf gemaakt) - BG73 - BG75 - BG78
Rood tinten: R14 - R46 - R59 - RV99
Donker bruine tinten: E43 - E44 - E47 - E49
Licht bruine tinten: E40 - E41 - E43
Grijs tinten: W1 - W3 -W5-W7-W9


Dan hebben we nog de lamp post, daar heb ik afwijkende kleuren voor gebruikt. Maar ik heb wel het rood van de andere plaatjes terug laten komen.
Voor de Lantaarn: YG63 - YG99 - BG69 - C1 - C3
Krans: G24
Strik: R14 - R46 - R59 - RV99


Dan wil ik jullie nog laten zien hoe alles een geheel is geworden.

  
 Alle bloemen, hout en takken komen allemaal uit mijn eigen voorraad.
Dit zijn kleine dingetjes die ik de laatste jaren bij elkaar gespaard heb.


Ik heb wel een hele poot foamball clay gebruikt ..... maar dat had ik ook echt nodig om het gewenste effect te bereiken.


Ik hoop dat jullie deze post met plezier hebben gelezen.
Tot de volgende keer!
 

Monday, November 21, 2016

Suso in Love


Goedendag Colourstock Fans,

Woensdagmiddag kwam ik er ineens achter dat ik nog een cadeautje voor één van mijn vriendinnen moest maken. Een paar maanden geleden heb ik ook al zoiets gemaakt, maar dan met een dansend stel. Zij vond dat zo'n mooi iets, dat ik ook zoiets voor haar heb gemaakt, alleen dan met een fairy. Deze dame  is een echte fairy fan.....dus ik denk dat dit cadeau haar wel bevalt.

Ik krijg regelmatig te horen, jij schudt die kleuren zo uit je mouw. Ik weet ontzettend veel combinaties uit mijn hoofd, maar regelmatig pak ik mijn Copic kleurenboekje erbij. Dit boekje kun je trouwens gratis downloaden op ons blog. De kleuren, die ik gebruikt heb voor het slakkenhuis van Suso, zijn ook een geheel nieuwe combinatie voor mij. Ik ben toch wel even bezig geweest voor ik de juiste combinatie had gevonden. Natuurlijk komt ook deze combinatie in het nieuwe versie van mijn boekje te staan.


Suso is één van de fairy's uit Mo Mannings Digitale Shop.
De paddenstoel is gemaakt met hulp van een shape art mal van Dutch Doobadoo. De hoed van de paddenstoel is helemaal gekleurd met Copic Markers. De witte vlekken heb ik aangebracht met Copic Opaque White en een dun penseeltje. De bodem is gemaakt van een MDF hart, dat ik nog had  liggen van een ander project. Alle bloemen en houten figuren zijn ook overblijfsels van oudere projecten. Zo zie je maar weer vroeg of laat komen dingen die je overhoudt toch weer van pas bij een nieuwe creatie.


 Welke Copic kleuren heb ik deze ronde gebruikt.

Voor Suso:
De huid: E000 - E00 - E04 - E11 - E21 en R20
De haren: YR21 - YR23 - YR27
De vleugels: BG10 - BV000 - R30 - Y00
De kleding: G12 - G14 - G16 en bruine multiliner 0.05
Het slakkenhuis: V09 - V12 - V15 - RV11 - RV32 - RV34 en Molotoe White.

De paddenstoelhoed: Y35 - Y38 - YR04 - YR07 - YR09 en Copic Opaque White

Ik hoop dat jullie deze post met plezier hebben gelezen.
Tot de volgende keer.

Sunday, November 6, 2016

The Seven Dwarfs


Hi Copic fans.

Occasionally you will work entirely in the wrong order. I've also done once again this time. In itself not a problem, you just deliver yourself a lot of work. When I bought this Seven Super Funny Dwarfs by Mo Manning, I printed them directly on Perfect Colouring Paper because I wanted to colour with my Copic Markers. During the colouring I had the idea to combine this with Gem-Tangles.


Probably, you have seen all kinds of versions of Gem-Tangles on the Internet recently.
Diny Sprakle hasshown us how you can do this with Copic markers or colouring pencils. But I wanted to go one step further. I wanted to incorporate letters instead. The letters and gems are drawn with a black Copic Multiliner 0.1mm and the fracture lines with colored Copic Multiliners.
The characters are made with a Letter Mask from the brand Dutch Doobadoo.


 After I was finished with colouring, I had a problem ....... what to do as a background? Luckily my husband had great idea ......why not a cave with diamonds?
 

 So I drew a few rocks, cut out and decorated them with modeling paste and let it dry overnight. I have them tinted with the Copic Airbrush. But still I'd not got the effect I wanted.


  So I thought I would go and see if I could find something that looked like diamonds. Fortunately, I found out that I still had some Ranger Stickles.That was just what I needed for a glitter effect. But when finished, it was still not to my liking.


Then the rest of the project should also receive a rocky appearance. First I placed a basic layer on my paper with the Copic Airbrush. I ripped white tissue paper into pieces and applied to the paper with Glazing Medium.  After drying, I have brought all tinted back with the Airbrush. By now you'd think you have what you want. 

 Fortunately there are more products I like to work with. So I added some depth with a few brown colours of Pan Pastel.

Finally, I could start building my project.
First I got the rocks and letters glued in place. Then I made a lot of little gems to bring back the colours of the gems in the background of the project. These colours I would have used on the dwarves but those details are so small that they do not stand out. By applying all those little blue and green gem it was still a beautiful whole.


These are all the colours I used :

Background with Airbrush:
Y26 - E07- E25 - E34

Dwarf on beer barrel:
Skin: E000 - E00 - E11 - E13 - E93 - R20
Beard: E35 - E37
Blouse: E31 - E33 - E34
Pants: B91 - B93 - B95 - B97 - B99
Socks: B24 - YG95 - YG97
Boots: E84 - E87 - E89
Mug: C1 - C3 - C5 - C7
Dwarf with green hat:
Skin: E000 - E00 - E11 - E13 - E93 - R20
Beard: W00 - W1 - W3
Vest: E43 - E44 - E47
Green Parts: YG93 - YG95 - YG97 - YG99
 Blue Parts: B21 - B23 - B26 - B28
Mug: C1 - C3 - C5 - C7 - R05


Dwarf with red hat:
Skin: E000 - E00 - E11 - E13 - E93 - R20
Beard: W00 - W1 - W3 - W5
Reds: R35 - R46 - R59
Blue tones B23 - B24 - B26 - B28
Yellows: Y38
Browns: E42 - E43 - E44 - E47

Dwarf with pick axe :
Skin: E000 - E00 - E11 - E13 - E93 - R20
Beard: E33 - E35 - E37
Helmet: C3 - C5 - C7 - Y11 - Y38 and E41
Jack: E08 - E35 - R59
Pick axe: C3 - C5 - E42 - E43 - Y09
Greens: YG93 - YG95 - YG97 - YG99
Browns: E25 - E27 - E29
Coins: Y38
Greys: C1 - C3 - C5 and W3 - W5 - W7

 Plump Dwarf
Skin: E000 - E00 - E11 - E13 - E93 - R20
Beard: C0 - C1 - C3
Upper: E84 - E87 - E89
Underwear: E33 - E35 - E37 - 0
Boots: E84 - E87 - E89
Pants: YG93 - YG95 - YG97 - YG99
Bracelet: Y35 - Y38 - R39
Mug: C1 - C3 - C5 - C7

Dwarf with big bag
Skin: E000 - E00 - E11 - E13 - E93 - R20
Beard: C0 - C1 - C3
Vest, bag and bracelet: E33 - E35 - E37 - E39 and Molotow Metallic Gold
Hat: B21 - B93 - B97 - B99 - E33 - E35 - E37 - Y38 - Y35
Pants: B93 - B97 - B99 - Y28 and molotow Metallic Gold 
Boots: W3 - W5 - W7 - W9
 
Seated Dwarf:
Skin: E000 - E00 - E11 - E13 - E93 - R20
Beard: E07 - E09 - E29
Blouse: YG93 - YG95 - YG97
Pants: B91 - B93 - B95 - B97 - B99 - E44 - Y38
Boots: E84 - E87 - E89 and W5 - W7 - W9
Bracelets: Y32 - Y35 - Y38 - R27 - R59
Mug: C1 - C3 - C5 - C7

Finally, the colour combination of text and gems:
Blue gems: B21 - B23 - B24 - B28 - B39
Green gems: YG01 - YG03 - YG25 - G09
Text: R29 - YR14 - YR16 - YR68

The lines are put with Molotov White.

I hope you have read this post with pleasure.
Until next time.


Saturday, October 15, 2016

Happy Halloween


Goedendag Colourstock fans,

De zomer is nu echt voorbij en we zijn weer in de herfst beland.
Gelukkig heeft ieder seizoen zo zijn charmes!
Nu zijn de bladeren aan bomen alweer aan het verkleuren, iets wat vaak een mooi kleurpalet geeft.
De natuur geeft ons knutselaars dus genoeg inspiratie voor mooie projecten.
 
Voor de Copic Markers is de natuur een perfecte inspiratiebron.
Daar is mijn kaartje dan ook een beetje op gebaseerd.......Halloween pompoenen.
Eén van de leukste dingen aan de herfst vind ik toch wel Halloween.
Jammer genoeg wordt dat hier niet zo gevierd.
Maar dat wil niet zeggen dat we geen leuke Halloween projecten kunnen maken.
 
Deze keer wil ik jullie stap voor stap laten zien hoe je op een gemakkelijke manier een pompoen kunt kleuren:


Stap1: Breng een basis aan met Y15 (vul vanaf beide zijde niet meer dan 1/3 deel, laat het midden open)

Stap2: Met Y19 kleur je over ongeveer 2/3 van de basis met Y15. Daarna pak je weer de Y15 en ga je een klein stukje over het einde van Y19 en de rest van Y15 om te blenden. (laat het midden nog steeds open)
 

Stap 3: Begin met de YR04 en kleur een  kleiner gedeelte in dan bij stap 2. Herhaal het tweede gedeelte van stap 2 met de Y19 en Y15 om alles weer mooi in elkaar over te laten lopen.

Stap 4: Nu ga je een gedeelte van je schaduw kleur aanbrengen met YR07. Je kleurt weer een kleiner gedeelte in en herhaalt stap 3. Je pompoen begint al wat vorm te krijgen. (het midden is nog steeds open)


 Stap 5: Breng een klein beetje schaduw aan onderaan de pompoen met YR09 en herhaal je weer de vorige stap.
 
Stap 6: Nu ga je alles langzaam naar het midden blenden met Y15 en Y19, zodat alles mooi in elkaar overloopt.


Alle drie de digi's die ik heb gebruikt zijn van Mo Manning.
De zandkorreltjes zijn bruine foam klei van Craft Emotions.
Natuurlijk heb ik de digi's afgedrukt op Copic Perfect Colouringpaper.


Natuurlijk wil je nog even weten welke kleuren markers ik gebruikt heb:

Huid: E0000 - E000 - E00 - E04 - E11 - E21 - R21
Haren: E33 - E35 - E37
Kleding: Y11 - Y13 - Y15 & YG01 - YG03 - YG06 - YG09
Pompoen: Y15 - Y19 - Y26 - Y28 - YR04 - YR07 - YR09 - YG03 - R59

Ik hoop dat jullie deze post met plezier hebben gelezen.
Tot de volgende keer.